Geo for multiple nodes
DETAILS: Tier: Premium, Ultimate Offering: Self-managed
This document describes a minimal reference architecture for running Geo in a multi-node configuration. If your multi-node setup differs from the one described, it is possible to adapt these instructions to your needs.
Architecture overview
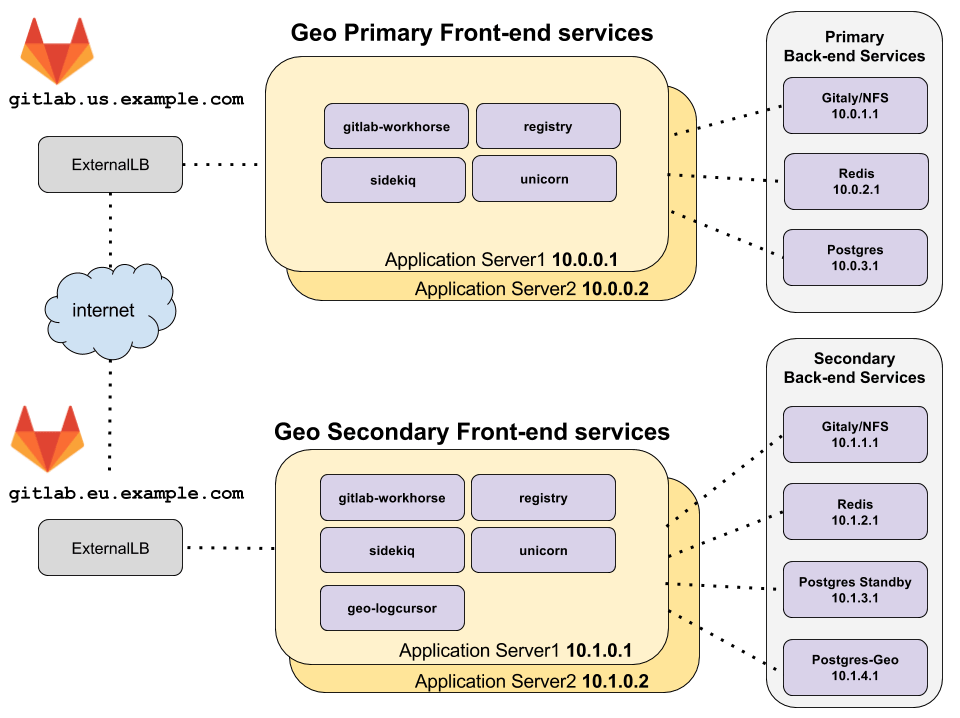
diagram source - GitLab employees only
The topology above assumes the primary and secondary Geo sites are located in two separate locations, on their own virtual network with private IP addresses. The network is configured such that all machines in one geographic location can communicate with each other using their private IP addresses. The IP addresses given are examples and may be different depending on the network topology of your deployment.
The only external way to access the two Geo sites is by HTTPS at
gitlab.us.example.com and gitlab.eu.example.com in the example above.
NOTE: The primary and secondary Geo sites must be able to communicate to each other over HTTPS.
Redis and PostgreSQL for multiple nodes
Because of the additional complexity involved in setting up this configuration for PostgreSQL and Redis, it is not covered by this Geo multi-node documentation.
For more information on setting up a multi-node PostgreSQL cluster and Redis cluster using the Linux package, see:
NOTE: It is possible to use cloud hosted services for PostgreSQL and Redis, but this is beyond the scope of this document.
Prerequisites: Two independently working GitLab multi-node sites
One GitLab site serves as the Geo primary site. Use the GitLab reference architectures documentation to set this up. You can use different reference architecture sizes for each Geo site. If you already have a working GitLab instance that is in-use, it can be used as a primary site.
The second GitLab site serves as the Geo secondary site. Again, use the GitLab reference architectures documentation to set this up. It's a good idea to sign in and test it. However, be aware that its data is wiped out as part of the process of replicating from the primary site.
Configure a GitLab site to be the Geo primary site
The following steps enable a GitLab site to serve as the Geo primary site.
Step 1: Configure the primary frontend nodes
NOTE:
Do not use geo_primary_role because it is intended for a single-node site.
-
Edit
/etc/gitlab/gitlab.rband add the following:## ## The unique identifier for the Geo site. See ## https://docs.gitlab.com/ee/administration/geo_sites.html#common-settings ## gitlab_rails['geo_node_name'] = '<site_name_here>' ## ## Disable automatic migrations ## gitlab_rails['auto_migrate'] = false
After making these changes, reconfigure GitLab so the changes take effect.
Step 2: Define the site as the primary site
-
Execute the following command on one of the frontend nodes:
sudo gitlab-ctl set-geo-primary-node
NOTE: PostgreSQL and Redis should have already been disabled on the application nodes during typical GitLab multi-node setup. Connections from the application nodes to services on the backend nodes should have also been configured. See multi-node configuration documentation for PostgreSQL and Redis.
Configure the other GitLab site to be a Geo secondary site
A secondary site is similar to any other GitLab multi-node site, with three major differences:
- The main PostgreSQL database is a read-only replica of the Geo primary site's PostgreSQL database.
- There is an additional PostgreSQL database for each Geo secondary site, called the "Geo tracking database", which tracks the replication and verification state of various resources.
- There is an additional GitLab service
geo-logcursor
Therefore, we set up the multi-node components one by one and include deviations from the typical multi-node setup. However, we highly recommend configuring a brand-new GitLab site first, as if it were not part of a Geo setup. This allows verifying that it is a working GitLab site. And only then should it be modified for use as a Geo secondary site. This helps to separate Geo setup problems from unrelated multi-node configuration problems.
Step 1: Configure the Redis and Gitaly services on the Geo secondary site
Configure the following services, again using the non-Geo multi-node documentation:
- Configuring Redis for GitLab for multiple nodes.
- Gitaly, which stores data that is synchronized from the Geo primary site.
NOTE: NFS can be used in place of Gitaly but is not recommended.
Step 2: Configure the Geo tracking database on the Geo secondary site
The Geo tracking database cannot be run in a multi-node PostgreSQL cluster, see Configuring Patroni cluster for the tracking PostgreSQL database.
You can run the Geo tracking database on a single node as follows:
-
Generate an MD5 hash of the desired password for the database user that the GitLab application uses to access the tracking database:
The username (
gitlab_geoby default) is incorporated into the hash.gitlab-ctl pg-password-md5 gitlab_geo # Enter password: <your_tracking_db_password_here> # Confirm password: <your_tracking_db_password_here> # fca0b89a972d69f00eb3ec98a5838484Use this hash to fill in
<tracking_database_password_md5_hash>in the next step. -
On the machine where the Geo tracking database is intended to run, add the following to
/etc/gitlab/gitlab.rb:## ## Enable the Geo secondary tracking database ## geo_postgresql['enable'] = true geo_postgresql['listen_address'] = '<ip_address_of_this_host>' geo_postgresql['sql_user_password'] = '<tracking_database_password_md5_hash>' ## ## Configure PostgreSQL connection to the replica database ## geo_postgresql['md5_auth_cidr_addresses'] = ['<replica_database_ip>/32'] gitlab_rails['db_host'] = '<replica_database_ip>' # Prevent reconfigure from attempting to run migrations on the replica database gitlab_rails['auto_migrate'] = false
After making these changes, reconfigure GitLab so the changes take effect.
If using an external PostgreSQL instance, refer also to Geo with external PostgreSQL instances.
Step 3: Configure PostgreSQL streaming replication
Follow the Geo database replication instructions.
If using an external PostgreSQL instance, refer also to Geo with external PostgreSQL instances.
After streaming replication is enabled in the secondary Geo site's read-replica database, then commands such as gitlab-rake db:migrate:status:geo will fail, until configuration of the secondary site is complete, specifically Geo configuration - Step 3. Add the secondary site.
Step 4: Configure the frontend application nodes on the Geo secondary site
NOTE:
Do not use geo_secondary_role because it is intended for a single-node site.
In the minimal architecture diagram above, there are two machines running the GitLab application services. These services are enabled selectively in the configuration.
Configure the GitLab Rails application nodes following the relevant steps outlined in the reference architectures, then make the following modifications:
-
Edit
/etc/gitlab/gitlab.rbon each application node in the Geo secondary site, and add the following:## ## Enable GitLab application services. The application_role enables many services. ## Alternatively, you can choose to enable or disable specific services on ## different nodes to aid in horizontal scaling and separation of concerns. ## roles ['application_role'] ## `application_role` already enables this. You only need this line if ## you selectively enable individual services that depend on Rails, like ## `puma`, `sidekiq`, `geo-logcursor`, and so on. gitlab_rails['enable'] = true ## ## Enable Geo Log Cursor service ## geo_logcursor['enable'] = true ## ## The unique identifier for the Geo site. See ## https://docs.gitlab.com/ee/administration/geo_sites.html#common-settings ## gitlab_rails['geo_node_name'] = '<site_name_here>' ## ## Disable automatic migrations ## gitlab_rails['auto_migrate'] = false ## ## Configure the connection to the tracking database ## geo_secondary['enable'] = true geo_secondary['db_host'] = '<geo_tracking_db_host>' geo_secondary['db_password'] = '<geo_tracking_db_password>' ## ## Configure connection to the streaming replica database, if you haven't ## already ## gitlab_rails['db_host'] = '<replica_database_host>' gitlab_rails['db_password'] = '<replica_database_password>' ## ## Configure connection to Redis, if you haven't already ## gitlab_rails['redis_host'] = '<redis_host>' gitlab_rails['redis_password'] = '<redis_password>' ## ## If you are using custom users not managed by Omnibus, you need to specify ## UIDs and GIDs like below, and ensure they match between nodes in a ## cluster to avoid permissions issues ## user['uid'] = 9000 user['gid'] = 9000 web_server['uid'] = 9001 web_server['gid'] = 9001 registry['uid'] = 9002 registry['gid'] = 9002
NOTE:
If you had set up PostgreSQL cluster using the Linux package and had set
postgresql['sql_user_password'] = 'md5 digest of secret', keep in
mind that gitlab_rails['db_password'] and geo_secondary['db_password']
contains the plaintext passwords. This is used to let the Rails
nodes connect to the databases.
NOTE:
Make sure that current node's IP is listed in
postgresql['md5_auth_cidr_addresses'] setting of the read-replica database to
allow Rails on this node to connect to PostgreSQL.
After making these changes, reconfigure GitLab so the changes take effect.
In the architecture overview topology, the following GitLab services are enabled on the "frontend" nodes:
geo-logcursorgitlab-pagesgitlab-workhorselogrotatenginxregistryremote-syslogsidekiqpuma
Verify these services exist by running sudo gitlab-ctl status on the frontend
application nodes.
Step 5: Set up the LoadBalancer for the Geo secondary site
The minimal architecture diagram above shows a load balancer at each geographic location to route traffic to the application nodes.
See Load Balancer for GitLab with multiple nodes for more information.
Step 6: Configure the backend application nodes on the Geo secondary site
The minimal architecture diagram above shows all application services running together on the same machines. However, for multiple nodes we strongly recommend running all services separately.
For example, a Sidekiq node could be configured similarly to the frontend
application nodes above, with some changes to run only the sidekiq service:
-
Edit
/etc/gitlab/gitlab.rbon each Sidekiq node in the Geo secondary site, and add the following:## ## Enable the Sidekiq service ## sidekiq['enable'] = true gitlab_rails['enable'] = true ## ## The unique identifier for the Geo site. See ## https://docs.gitlab.com/ee/administration/geo_sites.html#common-settings ## gitlab_rails['geo_node_name'] = '<site_name_here>' ## ## Disable automatic migrations ## gitlab_rails['auto_migrate'] = false ## ## Configure the connection to the tracking database ## geo_secondary['enable'] = true geo_secondary['db_host'] = '<geo_tracking_db_host>' geo_secondary['db_password'] = '<geo_tracking_db_password>' ## ## Configure connection to the streaming replica database, if you haven't ## already ## gitlab_rails['db_host'] = '<replica_database_host>' gitlab_rails['db_password'] = '<replica_database_password>' ## ## Configure connection to Redis, if you haven't already ## gitlab_rails['redis_host'] = '<redis_host>' gitlab_rails['redis_password'] = '<redis_password>' ## ## If you are using custom users not managed by Omnibus, you need to specify ## UIDs and GIDs like below, and ensure they match between nodes in a ## cluster to avoid permissions issues ## user['uid'] = 9000 user['gid'] = 9000 web_server['uid'] = 9001 web_server['gid'] = 9001 registry['uid'] = 9002 registry['gid'] = 9002You can similarly configure a node to run only the
geo-logcursorservice withgeo_logcursor['enable'] = trueand disabling Sidekiq withsidekiq['enable'] = false.These nodes do not need to be attached to the load balancer.
Step 7: Copy secrets and add the secondary site in the application
- Configure GitLab to set the primary and secondary sites.